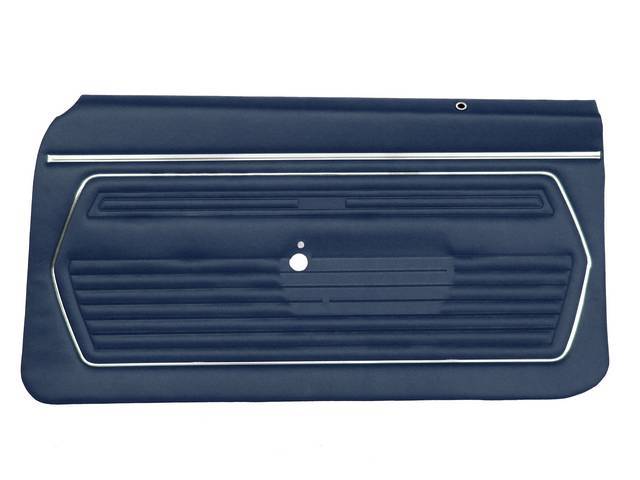
PANEL SET, Inside Door, Pre-Assembled, Std, Dark Blue, incl metal garnish rails, windowfelts and door lock ferrules installed, does not incl emblems
1969-1969 CAMARO CONVERTIBLE AND COUPE W/ STD INTERIOR

WARNING: This product can expose you to chemicals including lead and DEHP, which are known to the State of California to cause cancer and birth defects or other reproductive harm. For more information go to www.P65Warnings.ca.gov.
Finish is adequate. Fit is sub-par. Color match is close.Slightly lighter in color, but once in the car, non-owners or experts will not notice. FIT: It took a TON of time to get it to fit. There are no holes in the vinyl for the window handle, door handle, 3 holes for the arm rest, or the 4 screws at the bottom. There is "scored" cardboard on the back where these holes are supposed to be. DON"T TRUST ANY OF THESE without checking first. Mine were all off slightly. If I would have trusted them I would have ruined the door panel and it still wouldn't have fit. All three door arm rest holes I moved slightly which involved creating and cutting my own holes in the cardboard. The door handle was close enough, but the window handle had to be moved down about a 1/2 inch. Once through the cardboard, I used a hot soldering iron tip to melt the hole through the vinyl. I had to bend the metal flange on the top of the panel that fits over the window sill that holds the felt. Other wise the whole panel sits to high to screw in the 4 screws at the bottom or get the 6 metal pins(3 front/3 back) to clip into the door. Even after bending it down, I still had to modify the slots for the 6 pins slightly to get them to clip in. That involved an exacto knife and fine trimming to move 4 metal clips/pins down and 2 clips up. Then the 4 screw holes at the bottom still were too high. I just made my own. They were close but if you screw a screw through it, it ends up being a drastic angle and will bubble the vinyl and rip out the cardboard interior on the lower edge of the door. Ask me how I know. Do yourself a favor and just use a sharp awl and poke a hole in the right spot. Then I used a drill through the cardboard and a soldering iron tip to melt through/finish the finalhole so it looks nice. Once all of that is done, honestly it looks really nice. But if you don't have the time or the tools it'll be rough. This is not a plug and play door panel. Don't forget to buy the "Camaro" stick on emblem that goes right above the door handle, new screws for the bottom, new clips(6x), and door lock pull if you need it. I also recommend a new vapor barrier between the door panel and your door instead of the old tarred paper if you haven't already replace it.
Submitted on March 25, 2018 by Kraig L.


 In Stock!